In the last few posts we have been talking about the gRPC unary APIs and client server implementations. Today we will take a step further towards making it a real world application by adding support for a database.
When talking about databases we have several options like the relational databases and NoSQL databases. We can either pick up MySQL, a relational database or MongoDB, a NoSQL database. For this post I will be using MySQL via Docker instead of installing it locally in my system.
We will also define the users via ProtoBuf, design the database, use Docker and then we will create a database tables to map the todos to the users and finally complete both the user and todo service in Go using MySQL. Also, we will use the repository pattern for the data layer.
Let’s cover a few basics terminologies before jumping to the database part.
Note: I am assuming you are familiar with the basics of MySQL or PostgreSQL or any other relational database like MariaDB.
Layered Architecture
Layered architecture is a way of structuring an application by separating responsibilities into distinct layers, where each layer has a clear role and communicates only with the layer directly below or above it.
We can think of it like a stack, where each layer depends on the one beneath it. Let’s take an example:
1
2
3
4
5
6
7
8
9
10
11
12
13
Transport Layer (gRPC / HTTP)
        |
      calls
        |
Service Layer (Business Logic)
        |
      calls
        |
Repository or Data Access Layer
        |
      calls
        |
Database (MySQL, PostgreSQL, or MongoDB)
If you are into web development you might already know that we create services that the controller calls. Nest.js is a good example of the layered architecture in the Node.js ecosystem.
Repository Pattern
The Repository Pattern is a design pattern that acts as an abstraction layer between our business logic and our data source like a database. The repository hides how data is stored and retrieved. Instead of our application code talking directly to MySQL (SQL queries or ORM call), it talks to a repository interface.
Usefulness of Repositories
Repositories make testing easy.
Repositories allow us to create separation of concerns
Repositories allow us to swap the internal storage without breaking or touching other layers. We can switch from MySQL to MongoDB to Cassandra if we can keep the interface same.
Database Design
The database design in our example implementation is pretty simple. We have users who will create their todos. We can create the database diagram or the Entity Relationship diagram using the online tool https://dbdiagram.io/.
ER Diagram
This tool allows us to define the tables, create relationships between them and then it yield a beautiful ER diagram.
The above diagram is very helpful visually to understand the database tables and relations between them yet is hides a few things like the size of the column data types and the constraints we have on them. We will look at the concrete SQL queries soon in this post.
Using Docker
Docker allows us to run container containing the softwares we want in our system. They are particularly useful for doing POCs and running several different types of applications that we need for development and keep our laptop/local system clean. Without Docker, we would have to install different tools and configure them like MySQL.
Docker is also very helpful in case of running different versions of the same tool. For example what if we want to test our database design on both MySQL version 8+ and version 5.7 (the older but most widely used)? Docker will allow us to install both and make them listen to our commands on different ports.
We are creating a root user for the database with password grpc-example. This database instance will listen to the port 3306. So when we will try to connect to MySQL from application we will use the credentials:
For the protobuf files, we need to make some changes in the todo.proto file and also add a new user.proto file.
Todo ProtoBuf
For the existing todo.proto from the previous, we need to add a new field user_id this will be useful to map a todo to it’s creator. We can also name it creator_uuid.
// the user service definition service UserService { // registers a user rpc Register(RegisterUserRequest) returns (RegisterUserResponse); // allow user to login rpc Login(LoginUserRequest) returns (LoginUserResponse); // get a user rpc GetUser(GetUserRequest) returns (GetUserResponse); }
UserType type = 5; google.protobuf.Timestamp created_at = 6; }
The updated folder for the protos will now be having 2 files inside it.
1
2
3
protos
├── todo.proto
└── user.proto
Updating Makefile
Now that we have a new proto file we will need to compile that as well for the Go application and for that we will need to update the makefile to add the new compilation command for the user.proto file.
Since there are new proto files, we have to run the command make so that we can compile both the .proto files to get the Go auto-generated code for the ProtoBuf message and gRPC services.
After executing the make command, the updated generated folder will have the following files now:
Let’s get into the repository implementation for the data layer. We will create an interface for the repository for the users and for the todos.
We will create a new folder ``/internal/repository. Then we will add three files to it using the command touch repositories.go todo_repository.go user_repository.go`.
Now we have the repository interface defined. We can have it’s implementation for any data layer be it MySQL, Mongo, Cassandra or In-Memory. Let’s Look at the MySQL implementations of the repositories.
Todo Repository
We will implement the repository methods for the todos table of MySQL database. If a struct implements all the methods of an interface with identical signatures, Go implicitly considers the struct to implement that interface. This is an example of Go’s static structural typing, often described as duck typing.
type MySQLTodoRepository struct { // the db instance is for the SQL driver to execute the queries db *sql.DB }
funcNewMySQLTodoRepository(db *sql.DB) *MySQLTodoRepository { // accept the db instance and return the todo_repository instance return &MySQLTodoRepository{db: db} }
func(r *MySQLTodoRepository) Save(todo *pb.Todo) (*pb.Todo, error) { query := "INSERT INTO todos (uuid, title, description) VALUES (?, ?, ?)"
The repository should contain 3 files as we can see above.
Using MySQL Repositories
Now that we have the repositories in place. Let’s use them in the services. We have to do a bit of refactoring here, create a folder server and then three files touch server.go todo_service.go user_service.go.
Todo Service
Here’s the code for the Todo service that is using the uuid and the TodoRepository.
// save in DB todo, err := ts.repo.Save(todo) if err != nil { log.Printf("error creating todo: %+v", err) returnnil, status.Error(codes.Internal, fmt.Sprintf("failed to create Todo: %v", err)) }
// return the response return &pb.CreateTodoResponse{ Todo: todo, }, nil }
func(ts *TodoService) GetTodo(_ context.Context, req *pb.GetTodoRequest) (*pb.GetTodoResponse, error) { if req.GetUuid() == "" { returnnil, status.Error(codes.InvalidArgument, "ID should be positive") }
// get from DB val, err := ts.repo.FindByID(req.GetUuid()) if err != nil { log.Printf("error finding todo: %+v", err) returnnil, status.Error(codes.Internal, fmt.Sprintf("failed to get Todo: %v", err)) }
func(ts *TodoService) UpdateTodo(_ context.Context, req *pb.UpdateTodoRequest) (*pb.UpdateTodoResponse, error) { if req.GetUuid() == "" { returnnil, status.Error(codes.InvalidArgument, "ID should be positive") }
// get todo by id val, err := ts.repo.FindByID(req.GetUuid()) if err != nil { log.Printf("error updating todo: %+v", err) returnnil, status.Error(codes.Internal, fmt.Sprintf("failed to get Todo: %v", err)) }
// update the values from req val.Title = req.GetTitle() val.Done = req.GetDone() val.Uuid = req.GetUuid()
iflen(fullName) < 3 { returnnil, status.Error(codes.InvalidArgument, "invalid full name of user") } iflen(email) < 3 { returnnil, status.Error(codes.InvalidArgument, "invalid email of user") } iflen(username) < 3 { returnnil, status.Error(codes.InvalidArgument, "invalid full name of user") }
Note: For the Login service, right now we are just sending an arbitrary string value for token, we will replace this with JWT token once we cover authentication.
Now that we have the repositories defined and the services created using the MySQL repositories, we are ready to connect the gRPC server with the MySQL database. For this we need to do the following:
Create the database table in the docker database instance.
Create the connection in the Go application with the MySQL database.
Wire up the server, database and repositories in the main.go
Defining Connection
We will create a file inside the cmd folder named mysql.go. The connection code will look like:
// setup the connection pool db.SetMaxOpenConns(25) db.SetMaxIdleConns(25) db.SetConnMaxLifetime(5 * time.Minute)
// verify the connection if err := db.Ping(); err != nil { returnnil, err }
return db, nil }
We are doing nothing special here, this is the standard Go and MySQL connection code that is also available in the official documentation. We have just declared a configuration struct to make our life bit easy.
There are a few setting related to connection pooling that we are providing to the MySQL driver and needs your focus. They are:
In MYSQL, to create and use tables for storing the data we first need to define a database. Since we are using docker, we can use the terminal go go inside the docker container of MySQL and login using the credentials which I have already highlighted.
Let’s get inside the running container to access the MySQL database.
1
docker exec -it local-mysql bash
Then we will connect to the MySQL database from inside the container.
1
mysql -u root -p
It will ask for the password and we have to enter the password we set during the creation of the MySQL container which is grpc-example.
Now that we are inside the MySQL database we need to do a few things:
Create the database grpc_todos.
Create the user table.
Create the todos table.
Note: Ideally we have migrations, a set of files that are basically the database manipulations we have performed over time, for now I am skipping migrations.
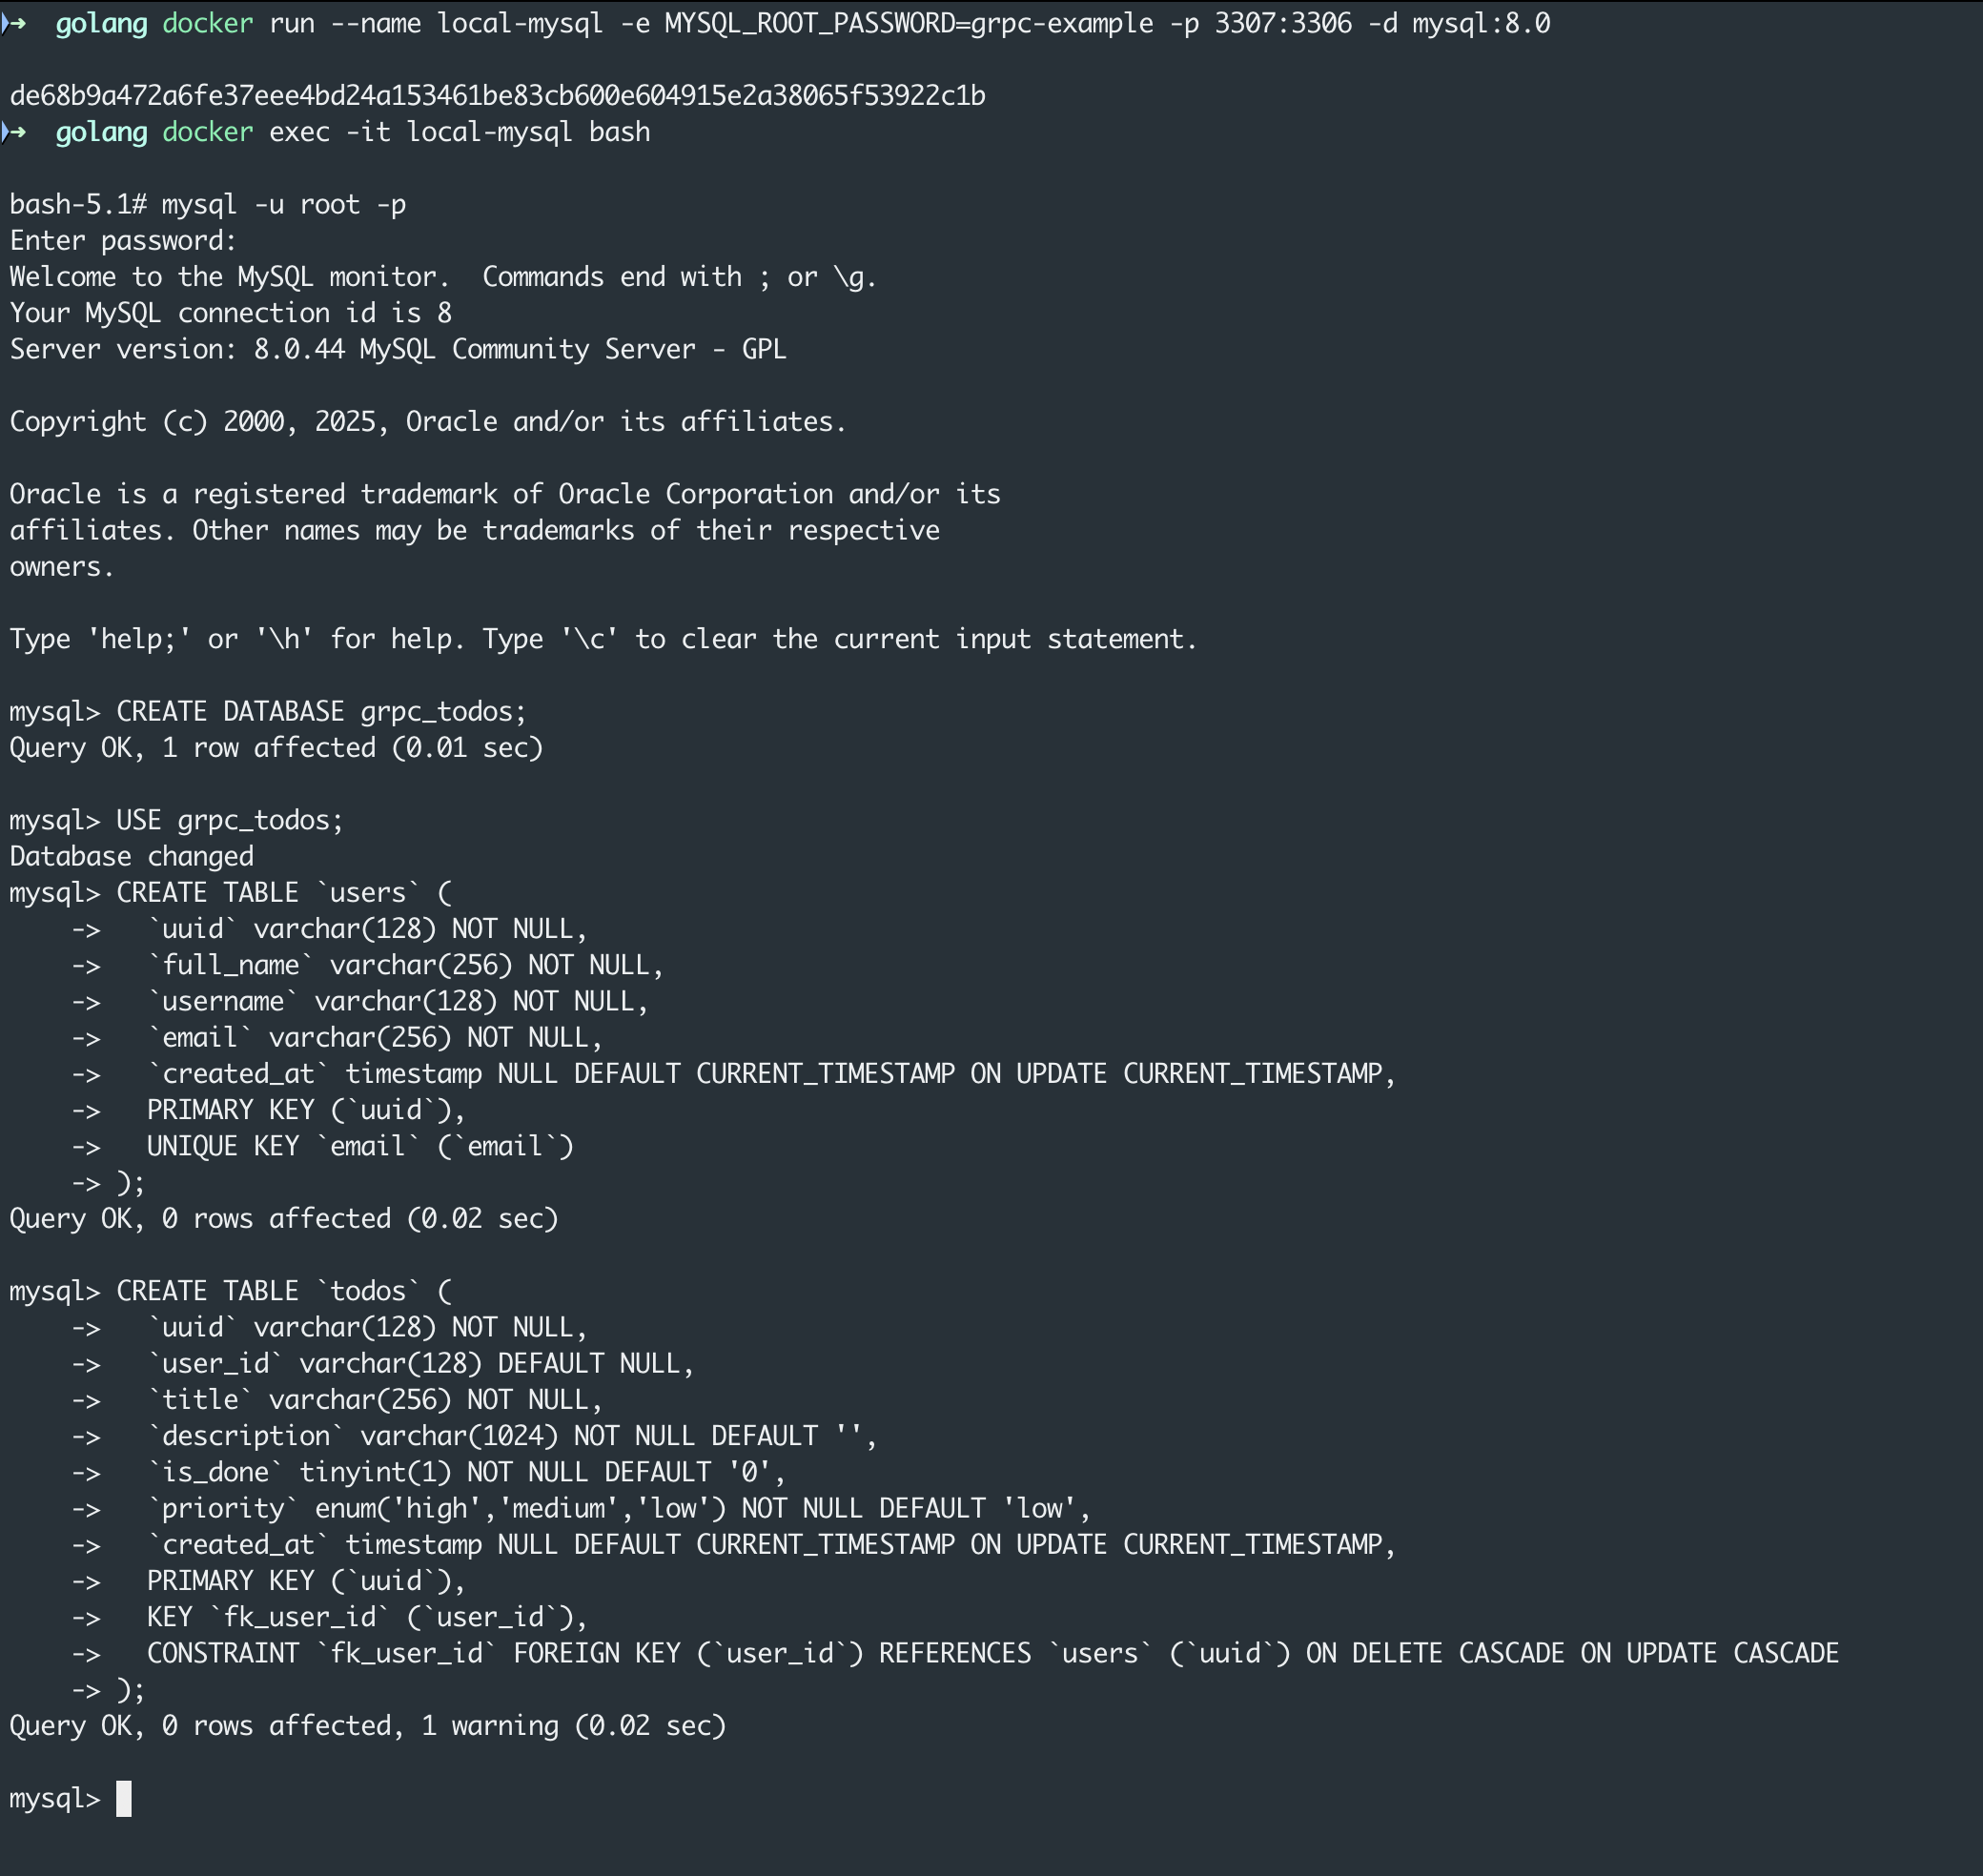
The terminal screenshot for all the MySQL operation from inside the docker container.
The commands are as follows:
1
2
3
4
5
-- create database CREATE DATABASE grpc_todos;
-- switch to the newly created database USE grpc_todos;
Now we can create the users and todos tables using the following commands:
-- users table CREATE TABLE `users` ( `uuid` varchar(128) NOT NULL, `full_name` varchar(256) NOT NULL, `username` varchar(128) NOT NULL, `email` varchar(256) NOT NULL, `created_at` timestampNULLDEFAULTCURRENT_TIMESTAMPONUPDATECURRENT_TIMESTAMP, PRIMARY KEY (`uuid`), UNIQUE KEY `email` (`email`) )
-- todos table CREATE TABLE `todos` ( `uuid` varchar(128) NOT NULL, `user_id` varchar(128) DEFAULTNULL, `title` varchar(256) NOT NULL, `description` varchar(1024) NOT NULLDEFAULT'', `is_done` tinyint(1) NOT NULLDEFAULT'0', `priority` enum('high','medium','low') NOT NULLDEFAULT'low', `created_at` timestampNULLDEFAULTCURRENT_TIMESTAMPONUPDATECURRENT_TIMESTAMP, PRIMARY KEY (`uuid`), KEY `fk_user_id` (`user_id`), CONSTRAINT `fk_user_id` FOREIGN KEY (`user_id`) REFERENCES `users` (`uuid`) ONDELETE CASCADE ONUPDATE CASCADE )
In the above MySQL tables there are a few improvements that can be done. Can you identify them? If not then don’t stress on them we will try to improve the tables via migration in future posts.
Putting it All Together
Now we can wire everything together in the main.go file which is located at the root of the folder of our project grpc-example.
// create a listener lis, err := net.Listen("tcp", ":9001") if err != nil { log.Fatalf("failed to listen: %v", err) }
// create a gRPC server object srv := grpc.NewServer()
// create our server server := server.NewServer( database, // pass the repositories repository.NewMySQLUserRepository(database), repository.NewMySQLTodoRepository(database), )
// register the reflection service on the grpc server reflection.Register(srv)
log.Printf("server started at port %s\n", "9001")
// providing the listener to the grpc service if err = srv.Serve(lis); err != nil { log.Fatalf("failed to serve gRPC server: %v", err) } }
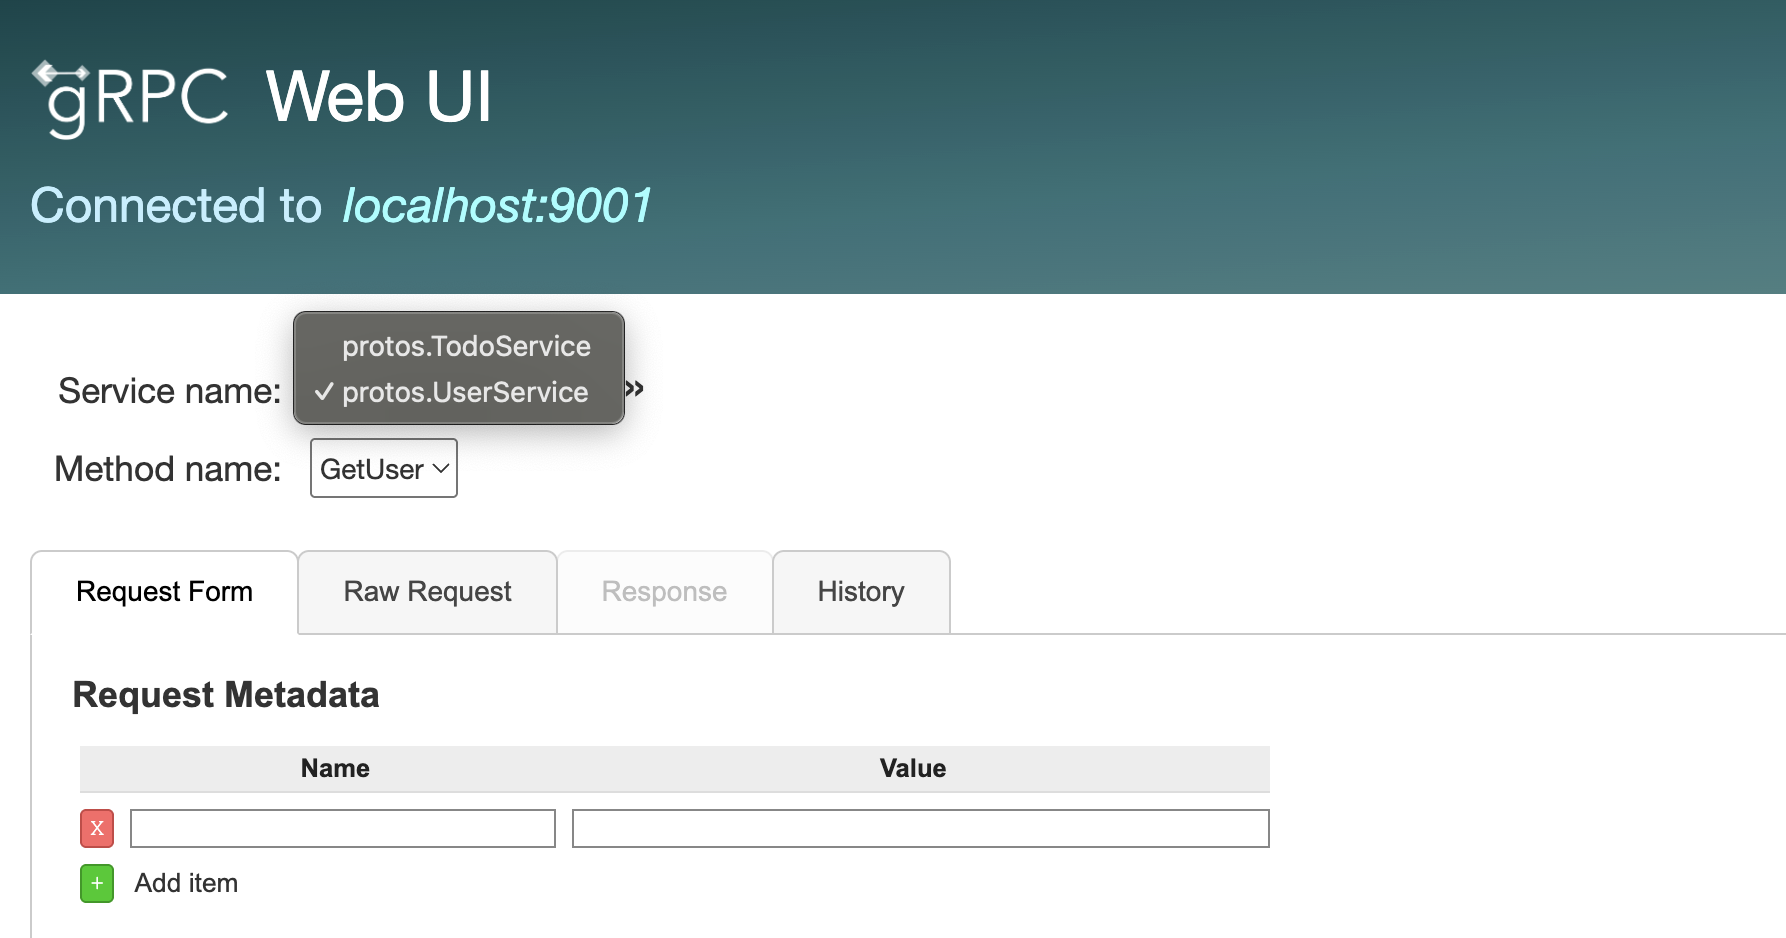
Now we can run the gRPC server via command - go run main.go. And we can also start the grpcui tool to test the RPCs. To start grpcui we will use the command.
1
2
3
grpcui -plaintext localhost:9001

gRPC Web UI available at http://127.0.0.1:49591/
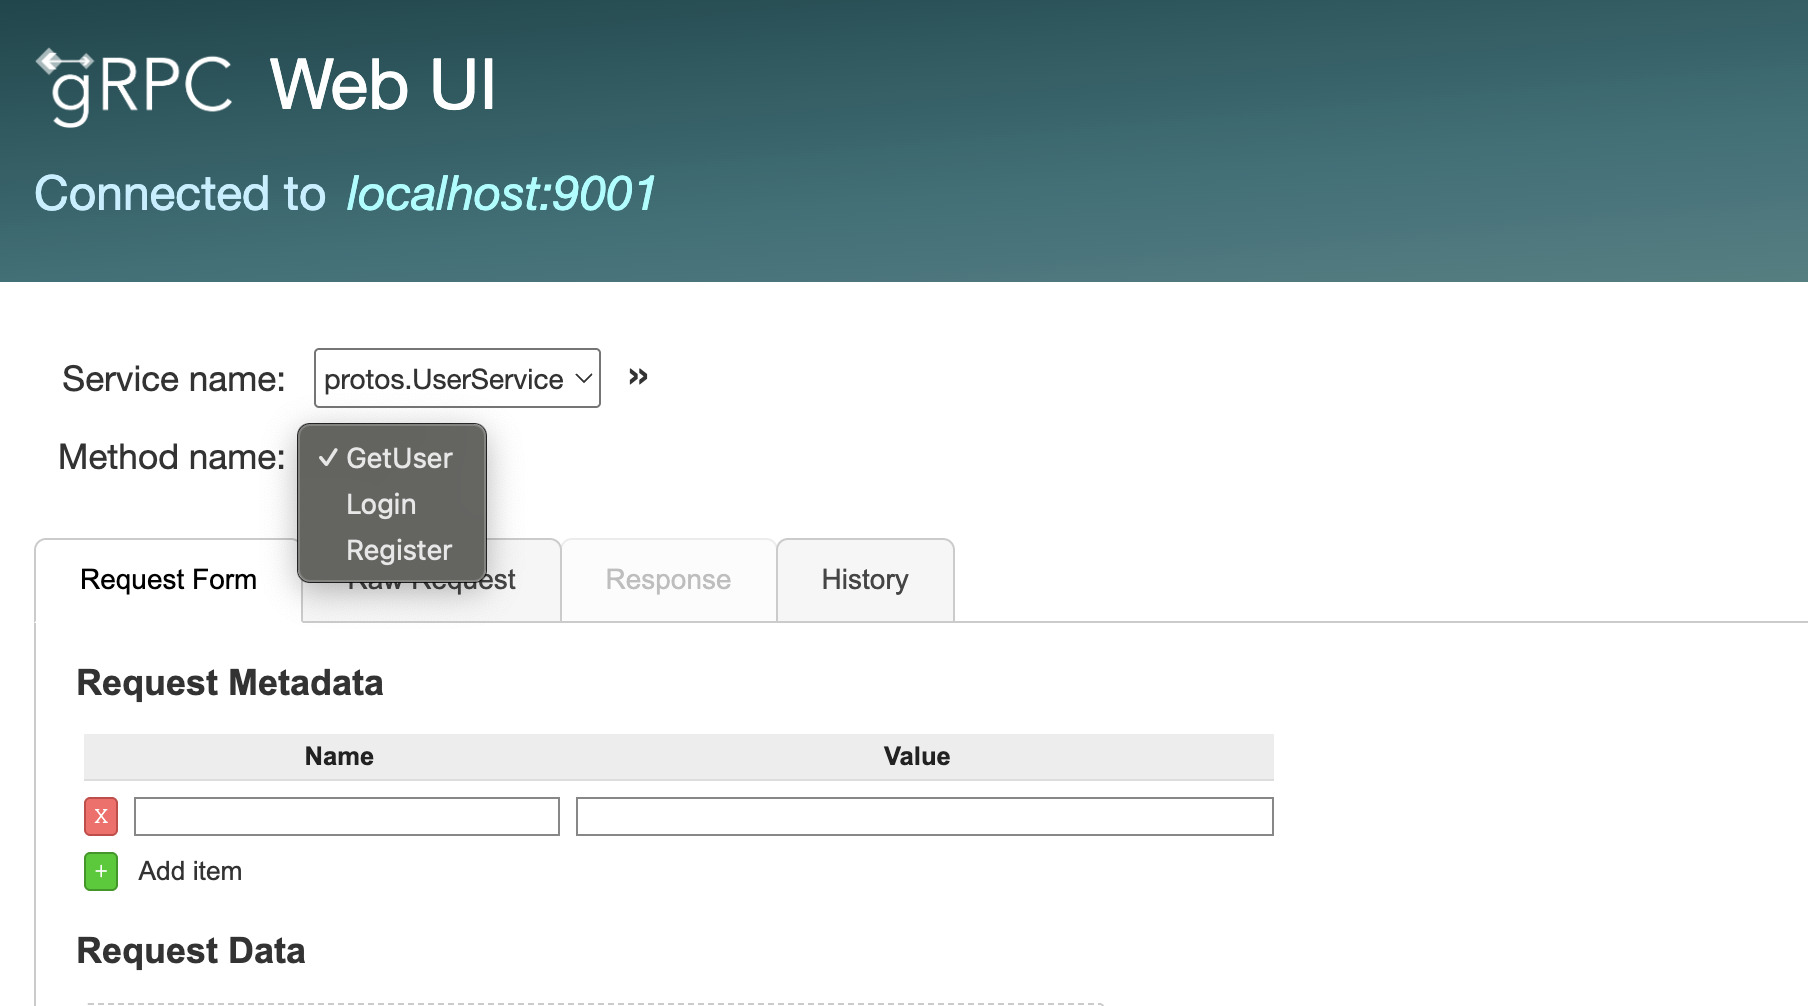
grpcui with the user service
grpcui with the user service RPCs
Conclusion
In this post, we extended our gRPC-based application beyond in-memory data handling and took an important step toward a real-world backend by integrating a relational database. Also applying the repository pattern, we created a clean separation between business logic and data access, making the application easier to maintain, test, and evolve.
We have accomplished a lot in this post.
Designed a relational database schema for users and todos
Ran MySQL locally using Docker for a clean development setup
Introduced layered architecture to separate transport, service, and data layers
Implemented the repository pattern to abstract database access
Integrated repositories into gRPC services
Wired the database, repositories, and gRPC server together
Tested the services using grpcui
There are a lot of things we missed from a real world production grade application. Let me list them so that we can take a few of them in future posts.
Use a proper migration tool (e.g., golang-migrate or Flyway)
Secure credentials using environment variables or a secret manager
Implement password hashing and secure authentication flows
Replace placeholder tokens with JWT based authentication
Add request-level context propagation to database queries
Handle soft deletes consistently in all queries
Add indexes to frequently queried columns
Add structured logging and monitoring (metrics, tracing)
Enable TLS for gRPC communication
Introduce rate limiting and input validation
Thanks for taking the time to read through this post. I hope it helped you understand how to integrate gRPC services with a relational database in a real-world app. Stay tuned for the next article in this series, where we’ll continue building and improving this application step by step.